Are you tired of playing racing games hunched over your desk or on the couch, longing for a more immersive experience? Building your own DIY sim racing cockpit may be just the solution you're looking for.
With a dedicated gaming area and a hidden setup that can easily be stowed away, you can transform your living room into the ultimate racing haven.
But where do you start? In this discussion, we will explore the steps and materials needed to create your very own racing throne, allowing you to take your virtual racing experience to the next level.
So, buckle up and get ready to dive into the world of DIY sim racing cockpits.
Key Takeaways
- Consider the dimensions, comfort, construction, and support of the racing seat.
- Look for a sturdy frame made of steel or aluminum that accommodates racing equipment.
- Invest in essential equipment like a racing wheel and pedals with force feedback technology.
- Focus on building a sturdy monitor mount and use cable management techniques for a clean setup.
Choosing the Right Racing Seat
When it comes to creating your DIY sim racing cockpit, one crucial aspect to consider is choosing the right racing seat.
The racing seat is where you'll be spending hours immersing yourself in the virtual racing world, so it's important to find one that suits your needs.
First and foremost, consider the dimensions and comfort of the seat. You want a seat that fits perfectly in your cockpit and allows you to sit comfortably for long periods of time.
Additionally, look for a seat with sturdy construction and ample support. The rigors of racing can put a lot of strain on the seat, so you want one that can withstand the intensity.
Adjustable features are also important. Look for a seat that allows you to adjust the recline and height to accommodate drivers of different sizes. This ensures that everyone can find a comfortable driving position.
Furthermore, consider the ergonomic design and padding of the seat. This will enhance your comfort during those long gaming sessions.
Lastly, think about the material and upholstery of the seat. You want something that not only looks great, but also complements the overall aesthetic of your setup.
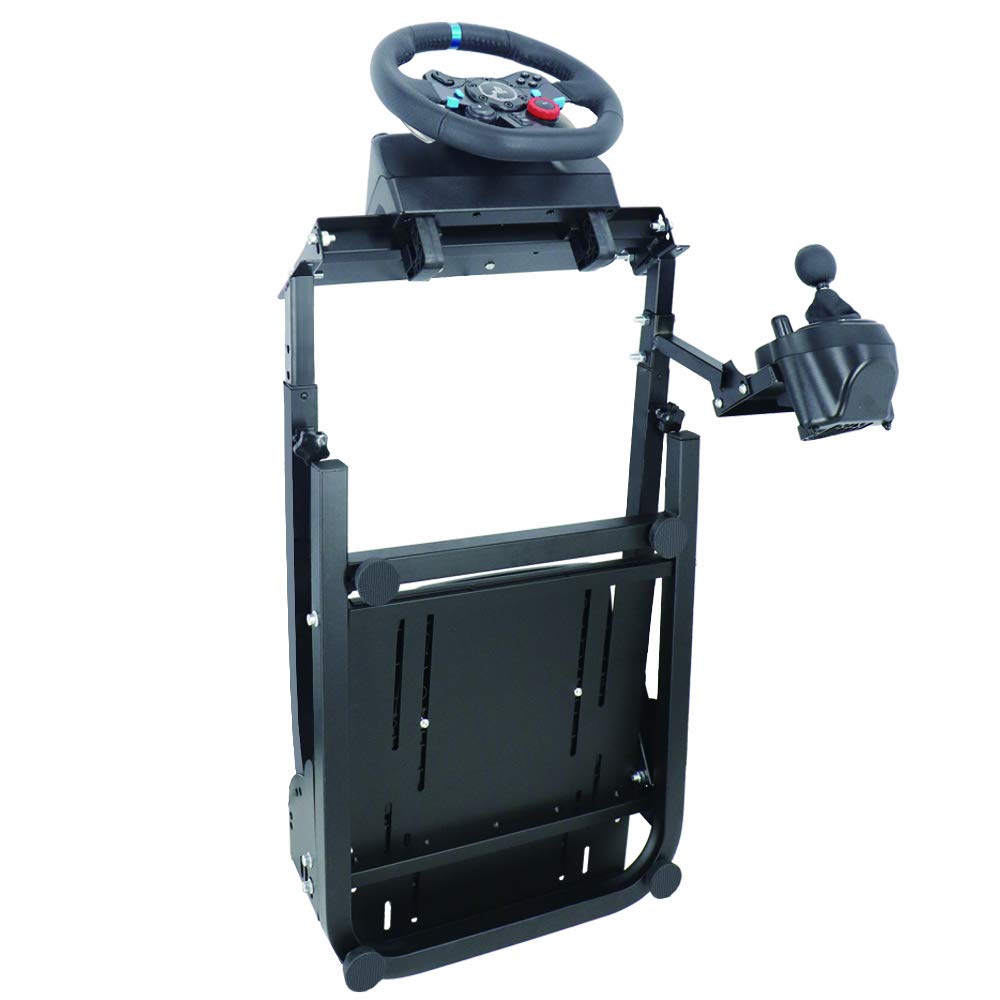
Selecting the Ideal Cockpit Frame
To ensure your DIY sim racing cockpit provides the ultimate racing experience, it's crucial to carefully select the ideal cockpit frame. The cockpit frame serves as the foundation of your setup, providing stability and support for all your racing equipment.
Here are three key factors to consider when choosing the perfect cockpit frame for your needs:
- Material and Build Quality: Look for a frame made from sturdy materials such as steel or aluminum, as they offer excellent durability and stability. A well-built frame will ensure that your cockpit can withstand the intense movements and vibrations experienced during racing sessions.
- Accommodation and Adjustability: Your cockpit frame should be designed to accommodate your racing equipment, including your steering wheel, pedals, and gear shifter. It's important to choose a frame that provides adjustability options, allowing you to find the optimal seating position and pedal placement for your comfort and performance.
- Ergonomics and Customization: Consider a cockpit frame that offers an ergonomic seating position, allowing you to maintain proper posture and reduce fatigue during long gaming sessions. Additionally, opt for a frame that allows for easy customization and the addition of accessories, such as monitor mounts or cup holders, to enhance your racing experience.
Essential Equipment and Accessories
Now that you have selected the ideal cockpit frame for your DIY sim racing setup, let's explore the essential equipment and accessories that will take your racing experience to the next level.
The first and most important piece of equipment is a racing wheel and pedals. These will provide you with realistic control and allow you to feel every turn and bump on the virtual track. Look for a wheel with force feedback technology for an even more immersive experience.
Next, you'll need a comfortable seat to enhance your gaming experience. Look for a seat that offers good ergonomics and adjustable features, so you can find the perfect position for long gaming sessions. Additionally, consider adding hinges or a folding mechanism to your cockpit frame. This will allow you to easily transform your setup when not in use, saving you space in your gaming area.
To add a professional finish to your cockpit, consider using upholstery materials. These can be used to cover your seat and any exposed parts of the frame, giving your setup a polished look.
Installing a Steering Wheel and Pedals
Now that you've assembled your DIY sim racing cockpit, it's time to install the steering wheel and pedals.
Begin by securely mounting the steering wheel to ensure stability during intense gameplay.
Next, connect the pedals and adjust their positioning for optimal comfort and ergonomics.
Lastly, don't forget to fine-tune the sensitivity of the wheel to match your personal preferences.
With these steps completed, you'll be ready to dive into the world of immersive sim racing experiences.
Mounting the Steering Wheel
Securely fasten the racing wheel and pedals onto the cockpit structure to ensure a stable and reliable setup for your sim racing experience. Here are three important considerations when mounting your steering wheel:
- Adjustable Pedal Plates: Opt for a cockpit with adjustable pedal plates. This allows you to customize the position of the pedals to suit your comfort and driving style. Adjusting the pedal plates can improve your overall control and performance.
- Mounting Hardware Options: Use suitable mounting hardware and brackets to secure the steering wheel and pedals onto the cockpit frame. Bolt everything tightly to prevent any movement during intense racing sessions. You can choose from various mounting options, including clamps or screws, depending on the design of your racing wheel and the cockpit structure.
- Troubleshooting Steering Wheel Connection: After installation, test the functionality of the steering wheel and pedals. Ensure they're properly aligned and functioning correctly. If you experience any issues with the steering wheel connection, refer to the manufacturer's troubleshooting guide or contact their customer support for assistance.
Connecting the Pedals
To complete the installation of your sim racing cockpit, it's time to connect the pedals and securely install the steering wheel.
Start by positioning the pedals at a comfortable distance from the seat. Make sure they're securely fastened to the cockpit structure to prevent any movement during intense racing sessions.
Once the pedals are in place, you can adjust their sensitivity to match your preferences. This will allow for more precise control and a better racing experience.
Next, connect the pedal wiring to the racing wheel. Ensure that the connections are secure and properly aligned. Double-check all the connections to avoid any potential issues while racing.
With the pedals installed and connected, you're one step closer to enjoying the thrill of virtual racing from the comfort of your own home.
Adjusting Wheel Sensitivity
Once the pedals are securely fastened and connected, it's time to fine-tune the sensitivity of your steering wheel for a customized racing experience. Adjusting the sensitivity of your wheel is crucial to finding the right balance between responsiveness and control.
Here are three things to keep in mind when adjusting the wheel sensitivity:
- Fine-tuning options: Most manufacturers provide software or settings that allow you to adjust the sensitivity of your wheel. Take advantage of these options to personalize your racing experience. Experiment with different sensitivity levels to find what feels most comfortable and natural to you.
- Troubleshooting common issues: If you're experiencing any issues with your steering wheel, such as lag or over-sensitivity, adjusting the sensitivity settings can often help resolve these problems. Start by making small adjustments and test them out in a driving simulation.
- Finding the right balance: It's important to strike a balance between sensitivity and control. Too much sensitivity can lead to twitchy steering, while too little can make it harder to react quickly. Play around with the settings until you find the optimal balance that suits your driving style and preferences.
Building a Sturdy Mount for Monitors
Now that you have your steering wheel and pedals installed, it's time to focus on building a sturdy mount for your monitors.
This is an important step to ensure optimal visibility and immersion during your sim racing experience.
In this discussion, we'll explore various monitor placement options, guide you in choosing the right mount for your setup, and provide tips on how to securely attach your monitors for a stable and secure display.
Monitor Placement Options
Consider enhancing your sim racing experience with a multi-monitor setup for a more immersive feel. When it comes to monitor placement options, there are a few key factors to consider. Here are three important aspects to keep in mind:
- Mounting Height: Position your monitors at the right height to avoid straining your neck and eyes. Mounting them at eye level will ensure a comfortable and ergonomic viewing experience.
- Ergonomic Positioning: Opt for adjustable arms or mounts that allow you to tilt, swivel, and adjust the monitors' position according to your preferences. This will help you find the perfect angle and reduce discomfort during long gaming sessions.
- Sturdy and Secure Mount: Choose a sturdy monitor stand or VESA mount that can securely hold your monitors in place. This will prevent any wobbling or shaking during intense races, ensuring a stable and uninterrupted view.
Choosing the Right Mount
To build a sturdy mount for your monitors, start by selecting a sturdy and durable material like medium-density fiberboard (MDF). This will ensure stability and support for your monitors. Consider the weight and size of your monitors to determine the appropriate dimensions and strength needed for the mount. To help you choose the right mount for your setup, here are some DIY monitor stand options:
| Mount Type | Description |
|---|---|
| Single Arm | A single arm mount that allows you to easily adjust the height and angle of your monitor. |
| Dual Arm | A mount that can hold two monitors side by side, providing a wider field of view. |
| Triple Arm | Similar to the dual arm mount, but designed to hold three monitors for a more immersive experience. |
When mounting multiple monitors, it's important to ensure they are properly aligned and secured. Use reinforcement and bracing techniques to support the weight and resist vibrations. Incorporate adjustable features to accommodate different monitor sizes and angles. Don't forget to prioritize cable management by including channels or clips within the mount to keep monitor cables organized and out of the way.
Securing the Monitors
For a secure and sturdy mount for your monitors, start by measuring and cutting the mount according to the dimensions of your monitors. This ensures a perfect fit and prevents any wobbling or instability.
Once you have the mount ready, use heavy-duty brackets or VESA mounts for a secure attachment to your cockpit. These brackets are designed to hold the weight of the monitors and provide stability during intense racing sessions.
Additionally, make sure that the mount is adjustable, allowing you to find the optimal viewing angles for your racing experience. This way, you can position the monitors at the perfect height and angle for maximum immersion.
Lastly, don't forget about cable organization. Incorporate cable management solutions to keep your setup tidy and prevent any tangling or interference.
Before you install the monitors, don't forget to test the stability of the mount. Give it a gentle shake and ensure that it can withstand the vibrations and movements of your racing sessions.
Wiring and Cable Management
Ensure a clean and organized setup by neatly tucking away wires and cables within the cockpit structure. Cable organization is crucial for a seamless racing experience. To help you with wire concealment and management, here are some tips and tricks:
| Tip | Description |
|---|---|
| Secure with Cable Ties or Clips | Use cable ties or clips to keep wires in place and prevent them from tangling during intense gameplay. |
| Conceal with Cable Sleeves or Conduit | Consider using cable sleeves or conduit to hide and protect wires along the cockpit frame. This not only improves the aesthetics but also prevents any accidental damage. |
| Label for Easy Identification | Labeling the wires and cables will save you time during troubleshooting or when making adjustments. Use color-coded labels or tags for quick identification. |
| Leave Access Points | It's essential to have access points for easy maintenance and adjustments to the wiring. Plan your cable routing accordingly to ensure accessibility. |
| Troubleshooting | If you encounter any issues, check the cables first. Ensure they are securely connected and not damaged. Use cable management techniques to narrow down the problem area. |
Adding Realistic Force Feedback
For an immersive and realistic racing experience, adding realistic force feedback to your DIY sim racing cockpit is essential. Here are three important steps to help you achieve that:
- Choose the right force feedback racing wheel:
To simulate the feel of a real car, it's crucial to invest in a racing wheel with realistic resistance. Look for a wheel that offers strong force feedback and accurately replicates the sensations of driving, such as the resistance when turning or the feedback when hitting curbs.
- Adjust the force feedback settings:
Once you have your racing wheel, take the time to fine-tune the force feedback settings in your racing game. Each wheel has its own characteristics, so adjusting the force settings will help match it with the game and optimize the experience. Experiment with different settings to find the perfect balance between realism and control.
- Consider tactile transducers installation:
To further enhance the force feedback experience, you can add tactile transducers to your cockpit. These transducers create vibrations and rumble effects that can simulate engine rumble, tire contact, and even road texture. Mount them strategically in your cockpit to enhance the overall immersion.
Enhancing Immersion With Surround Sound
Ready to take your sim racing experience to the next level? Enhancing immersion with surround sound is a game-changer.
By strategically placing speakers around your racing cockpit, you can create a truly immersive audio experience. Positioning rear speakers behind your seating area will enhance the sense of depth and directionality, while a high-quality sound system will accurately reproduce engine roars, tire squeals, and environmental sounds.
With the right speaker placement and settings, you can achieve a balanced and enveloping sound field that will make you feel like you're right in the heart of the action.
Surround Sound Setup
To create a truly immersive racing experience, optimizing your surround sound setup is essential. Here are three key factors to consider when setting up your surround sound system:
- Speaker positioning: Take into account the size and layout of your room when deciding where to place your speakers. Ensure they're strategically positioned to achieve optimal sound distribution and create a realistic audio environment.
- Audio calibration: Proper calibration of your surround sound system is crucial for achieving a balanced and immersive audio experience. Make sure to sync and calibrate your speakers to ensure accurate sound reproduction and avoid any discrepancies between the audio and visual elements of your simulation.
- High-quality speakers: Invest in high-quality speakers and subwoofers to enhance the depth and clarity of the racing simulation audio. This will allow you to fully immerse yourself in the virtual racing world and hear every detail, from the roaring engines to the screeching tires.
Speaker Placement Tips
Enhance the immersive experience of your sim racing setup by strategically placing your speakers to achieve optimal sound distribution and enveloping surround sound.
When it comes to speaker placement, there's a fine balance between sound accuracy and practicality within your racing cockpit.
To create a more realistic and enveloping sound, position your speakers at ear level or slightly above. This ensures that the sound is directed towards you, making it feel like you're in the middle of the action.
For a more expansive and immersive surround sound effect, consider placing rear speakers behind you and at an angle. This helps to create a sense of depth and dimension.
Don't be afraid to experiment with speaker placement to find the perfect balance that suits your setup. And remember, using speaker stands or wall mounts can help achieve the best possible positioning for your surround sound system.
Customizing Your Cockpit With Decals
When it comes to personalizing your sim racing cockpit, one exciting way to enhance its visual appeal is by customizing it with eye-catching decals. Vinyl decal designs offer endless possibilities for creating a unique and personalized look for your setup. Whether you want to showcase your favorite racing team or sponsor logos, or design your own custom decals, the options are limitless.
Here are three important things to consider when customizing your cockpit with decals:
- Custom decal application: Vinyl decals are easy to apply and can be easily removed without leaving any residue behind. This means you can change up the look of your cockpit whenever you want, without damaging the surface or paint. Make sure to clean and dry the surface before applying the decals to ensure a smooth and long-lasting application.
- Cockpit decal care: To keep your decals looking their best, it's important to take proper care of them. Avoid using harsh chemicals or abrasive materials when cleaning your cockpit, as these can damage the decals. Instead, use a mild soap and water solution and a soft cloth to gently clean the surface. Additionally, avoid placing any sharp objects or heavy items on top of the decals to prevent scratching or peeling.
- Creating a cohesive theme: To achieve a polished and professional look, consider using matching decals for your seat, wheel, and pedals. This will create a cohesive theme throughout your cockpit and give it a stylish and unified appearance. Whether you choose a bold and vibrant design or a sleek and minimalist look, customizing your cockpit with decals is a fun and effective way to make it truly your own.
Maintenance and Upkeep Tips
If you want to keep your DIY sim racing cockpit in top shape and ensure a smooth and enjoyable gaming experience, it's essential to follow some key maintenance and upkeep tips.
Regular maintenance is crucial for extending the lifespan of your cockpit and preventing any potential issues that may arise. One important aspect of maintenance is cleaning. Use appropriate cleaning techniques to keep your cockpit clean and dust-free.
Regularly inspect and tighten screws and bolts to ensure stability and safety while gaming. Additionally, lubricate moving parts such as seat sliders and hinges to prevent wear and ensure smooth operation.
Troubleshooting common issues is also an important part of upkeep. If you encounter any problems, take the time to identify the root cause and address it accordingly.
Lastly, don't underestimate the importance of regular maintenance. By taking proactive measures, you can prevent minor issues from escalating into major problems. So, make it a habit to inspect and maintain your DIY sim racing cockpit regularly. It won't only improve your gaming experience but also prolong the life of your setup.
Frequently Asked Questions
How to Build a Sim Racing Rig?
To build a sim racing rig, start by gathering the necessary building materials such as wood, screws, and brackets. Consider your budget and look for cost-saving alternatives like repurposing old furniture.
The beauty of building your own rig is the customization options available. You can design it to fit your specific needs and preferences. So whether you want a compact setup or a full-blown racing throne, building your own rig allows for endless possibilities.
Can You Make Money off Sim Racing?
Yes, you can make money off sim racing! The earning potential is quite impressive. You have sponsorship opportunities from gaming brands and equipment manufacturers who want to partner with skilled racers.
Virtual racing leagues also offer prize money and sponsorships for competitive players. By building a strong online presence through streaming and content creation, you can generate ad revenue and attract sponsorships.
You can even create and sell custom sim racing setups or accessories to further increase your income.
The possibilities are endless!
Can You Go From Sim Racing to Real Life Racing?
So you've been honing your skills in the virtual world of sim racing, but now you're wondering if you can make the leap to real-life racing.
Well, let me tell you, transitioning from sim racing to professional racing isn't an easy task. However, sim racing does offer some benefits for real-life racing skills.
It can help you develop a better understanding of racing lines, improve your reaction time, and enhance your overall racing strategy.
But be prepared for the challenges of adapting to the physical demands of real-life racing and the need for real-world experience.
Does Sim Racing Improve Real Racing?
Sim racing definitely improves real racing skills. It allows for skill transferability, helping you become a better driver on the track.
Sim racing enhances mental preparation by honing your race strategy and decision-making abilities. It provides a safe and accessible platform for aspiring racers who may not have access to real-life racing.
Sim racing offers a realistic experience, improving your competitive edge and overall performance on real tracks.
Conclusion
In the world of sim racing, your cockpit is your throne, your gateway to an exhilarating and immersive racing experience.
By building your own DIY sim racing cockpit, you not only save space but also create a dedicated gaming area that can be hidden away when not in use.
Like a hidden gem, this racing throne blends seamlessly into your living room, enhancing its overall aesthetic.
So let your imagination run wild as you build your own racing kingdom and conquer the virtual track with style and precision.